Moist Coffee Cake (New!)

After missing for so many years without updating my blog, this is my first post on my attempt for Moist Coffee Cake adapted from Celia.

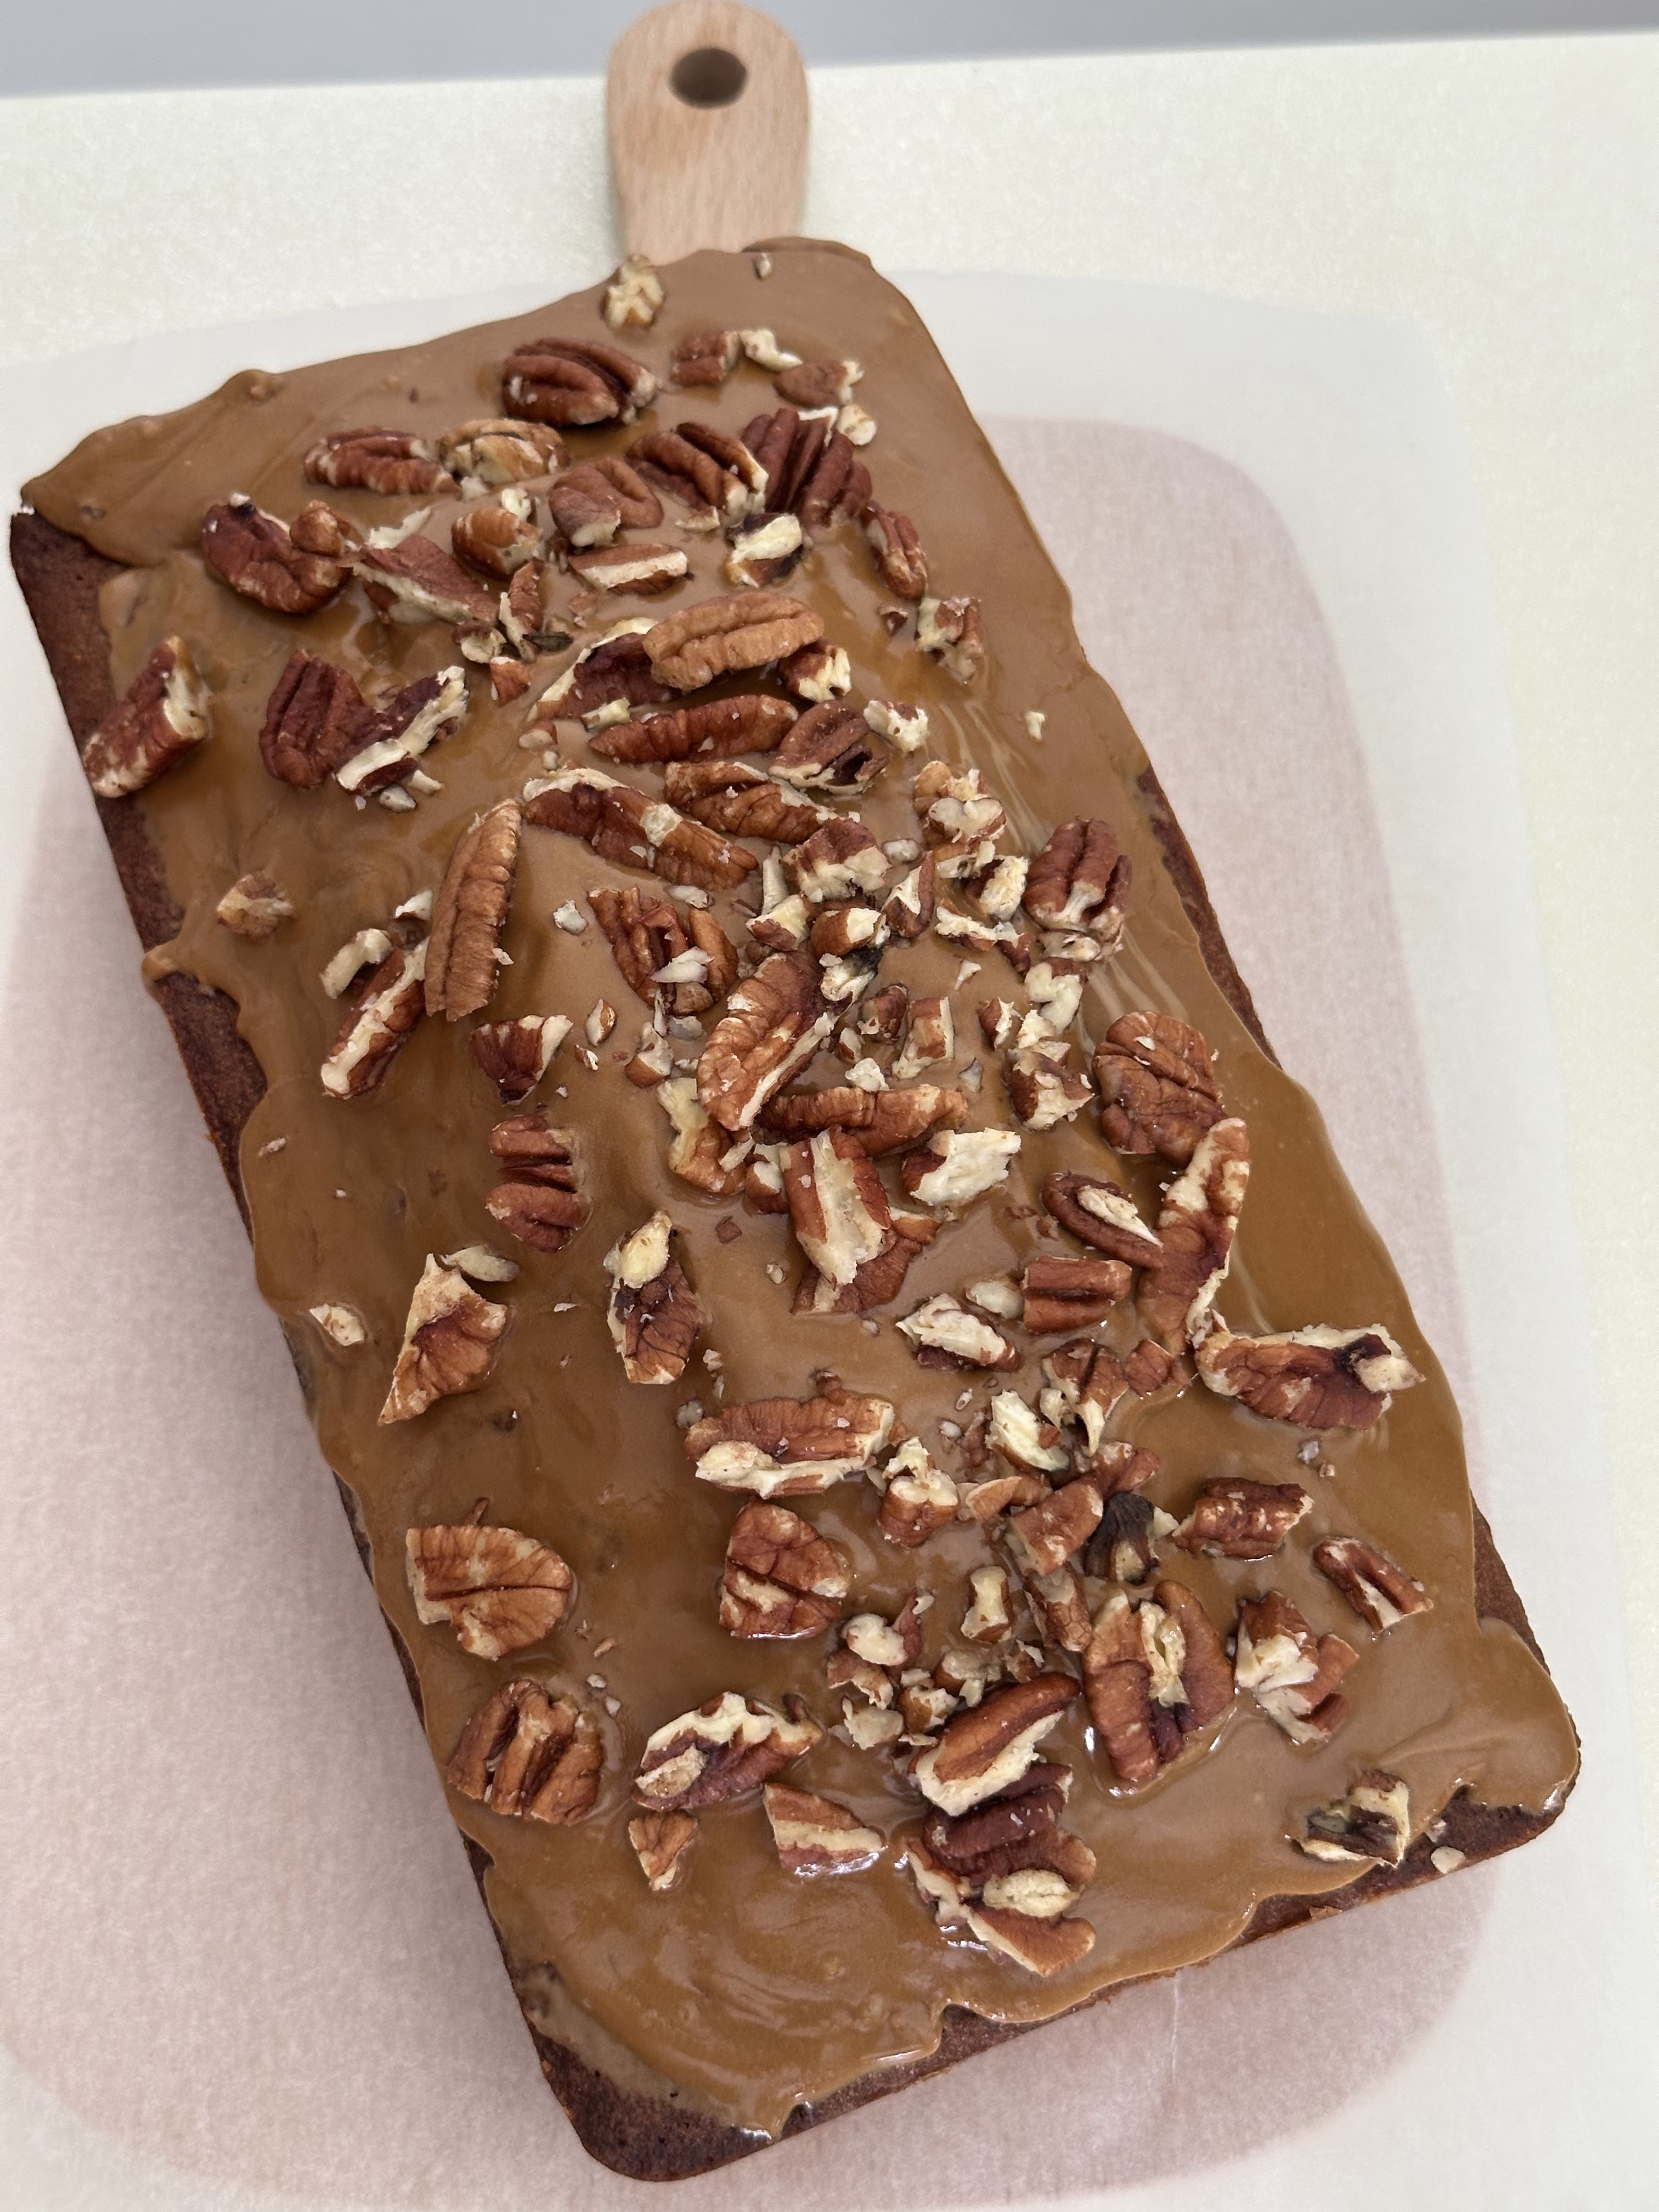
This is for my own log on what I have modified from her original recipe to suit my own taste. The cake was moist and nice. I didn't add the walnuts though, but I sprinkled some chopped pecans on the frosting. I would probably try this again with walnuts in future!

Recipe for Moist Coffee Cake

Ingredients:

225 g flour 

1 tsp baking powder

⅛ tsp baking soda

½ tsp salt

100 g walnuts chopped, plus extra for topping (I omitted this)

255 g unsalted butter cubed and at room temperature

225 g caster sugar (180g used)

4 eggs

1 tsp vanilla essence (coffee extract used)

1½ tbsp instant coffee granules (I used estimation based on the instant coffee sachets I had)

1 tbsp hot water

3 tbsp full-cream milk (can add slightly more)

For the coffee glaze

15g unsalted butter

100 g icing or confectioner’s sugar (80g used)

1 tbsp instant coffee granules

1 tbsp hot water

Some chopped pecans


Instructions:

Make the cake:

Pre-heat oven to 165°C (325°F).

Grease a 9 x 5 inch loaf pan with extra butter and lightly dust with flour. Shake off the excess flour.


Sift flour, baking powder, baking soda and salt into a mixing bowl. Stir in the chopped walnuts. Set aside.

Dissolve instant coffee granules in hot water. Stir in the milk. Set aside.

Using a stand mixer fitted with a paddle attachment or handheld mixer fitted with beaters, cream butter and sugar until light and fluffy, on medium speed. This may take 6 to 8 minutes.

Add eggs, one at a time, beating each addition until well incorporated.


Keeping a light hand, fold ⅓ of the flour-walnut mixture into the creamed butter mixture, followed by ½ of the coffee-milk solution. Do not over-mix the batter.


Fold in the next ⅓ of the flour-walnut mixture, followed by the remaining ½ of the coffee-milk solution. Again, without over-mixing the batter, fold in the last ⅓ of the flour-walnut mixture.

Lastly, fold in the coffee extract until well incorporated.

Pour batter into greased pan and bake in slow oven for 50 to 60 minutes (I baked for 55 mins in middle rack at 165C). Once the centre of the cake springs back when pressed, or a bamboo skewer inserted into the centre of the cake emerges free of cake batter, the cake is done.

Remove from the oven and leave the cake in the pan for 10 – 15 minutes before turning out onto a metal rack to cool completely.

Once the cake is completely cool, make the coffee glaze. Drizzle over the cake, and sprinkle walnuts (pecans) over the top. Allow the glaze to firm up and set for clean slices.


Make the coffee glaze:

In a small bowl, dissolve instant coffee granules in hot water.

In a mixing bowl, cut the butter into icing sugar with a wooden spoon or whisk.

Once the mixture resembles breadcrumbs, stir in the coffee solution, bit by bit, until you get a thick but pourable consistency. If you want the glaze more firm, add more icing sugar.


Coffee Cake

Meyer Lemon Tartlets

Tis the Meyer lemons season.

Cannot resist Meyer lemons when I see them at the supermarket. Whether how I would use it, it doesn't matter to me. I'll just buy them then decide.

I made a meyer lemon pound cake and it was so moist and fragrant. With the extra lemons on hand, I decided to make into lemon curd so as to slowly savour it. Nudged by a friend to make tarts, and so, Lemon tarts were made. I can actually eat the lemon curd on its own. Meyer lemons has a very special taste. The curd was tarty and sourish. People I gave to, finds it nice and very refreshing. It is my favourite. And I think I can just simply use it as a bread spread. The curd is so versatile!

View post on imgur.com

Recipe for Meyer Lemon Tarts

Meyer Lemon Curd, modified from Sally's Baking Addiction

Ingredients:
2 Egg yolks + 1 whole egg
75g Granulated sugar
2 Lemon zest
84g Lemon juice (from 2 Meyer lemons)
80g salted butter

1. Put all ingredients in a bowl, except for butter, over a pot of simmering hot water. 
2. Double boil till thicken then remove from heat and add butter in.
View post on imgur.com

3. Stir well to melt the butter.
4. Cover with cling wrap till ready to use. Otherwise, pour into a glass jar immediately and capped it. Cool it before placing in the fridge.

View post on imgur.com

Tart Shells, adapted from Lust by Audrey Tan
(Makes 30 mini tartlets)

Ingredients:
63g Butter, salted
45g Granulated sugar
25g Egg white, or half a beaten egg
125g Plain flour, sifted

Method:
1. To mix by hand, cream butter and sugar with a wooden spoon until light and fluffy.
View post on imgur.com

2. Then add in egg and mix well.
3. Add flour to form the dough. (Added more liquid, the dough was difficult to gather)
4. Flatten the dough into a disc and cover with a plastic wrap. Refrigerate for 30mins.
5. On a floured surface, roll dough out into a 0.3mm thick sheet. Use a small round cutter to press out circles.
6. Place dough into prepared tartlet tins, ensuring that dough is well pressed into sides and bottom of tins. Prick bottom of each tart with a fork. (As mine was soft, I placed it into the fridge first before baking).
7. Blind bake at 180C for 14-15mins until browned at the sides.
8. Remove from the oven. The shells will harden when cooled.
View post on imgur.com


Assembly:
1. In the cooled tart shells, scoop the lemon curd.
2. Decorate with toasted pistachio nuts.
3. Chilled and serve, or can serve immediately.
View post on imgur.com

Quiche with flaky crust

With the current situation of COVID-19 affecting the whole world, many of us were "forced" to work from home (wfh). Shops, malls, restaurants were all shut. It was a pitiful sight. Many business had to close because of this pandemic. All of us can't wait to resume our normal life of retail therapy and dining out. Meeting friends and attending workshops.

On the other hand, it's a new experience to be able to work from home. What seems not possible previously, has become part of our life now. I enjoyed the new work arrangement because that means I have more time to myself having saved that from traveling to and fro work daily. However, it's a mixed feeling that being at home means I can't communicate with my colleagues and I so missed that lunch time bonding with them too.

During this period of locked-down, ours termed as Circuit Breaker or commonly known as CB, many of us have turned to home cooking/baking. Flours, cheese and what nots that are used for cooking or baking, are out of stock. Soon, we will see many master chefs emerged from this CB. Although we have exited from our CB on 2 June, things have not resumed. And first time in history, June becomes a school term whereas previously, it will have been a school holiday.

I don't cook or bake as much as I wanted because I was diligent to do my exercise everyday after work. Therefore, I don't have the luxury of time to cook dinner for the family, although I really would like to. The initial wfh, I was still enthusiastic to prepare my own healthy lunch. Subsequently, I just ate whatever my helper prepares. 

There was a day where I had an extra on hand, so I decided to make quiche. It was easy to prepare, and it tastes wholesome too! The pastry was flaky and buttery good.


View post on imgur.com
Recipe for Quiche
(Makes 2 8" round pans)

Ingredients:

Flaky Pastry Crust, adapted from Bake! by Nick Malgieri 
260g Plain flour 
1 tsp baking powder 
1/2tsp salt 
170g Unsalted butter, cold, diced (I used salted butter and added a pinch of salt instead) 
2 small eggs, beaten 

Method:
1. Add all the ingredients in a bowl except eggs.
2. Use finger tips to gently rub-in the flour with the butter till powdery . 
View post on imgur.com
3. Then add in eggs and use a fork to mix well. 
View post on imgur.com
4. Divide dough into 2 and refrigerate it for at least 1 hour. 

Fillings 
Corns 
Broccoli, cut into small pieces 
1 large onion, diced 
1 pkt Shimeiji Mushrooms 
1 pkt back bacon (approx 10 pcs) 
Knot of butter for frying 
Ground pepper
Some mixed herbs
Ground garlic

Method:
1. In a non-stick sauce pan, fry the bacon whole till slightly brown. 
2. Remove and add butter and fry the onions followed by the rest.
View post on imgur.com
3. Cut the bacon to smaller pieces and add to the mix.

Eggs Mixture
200g whipping cream 
5 large eggs 
70g milk 
300g Cheddar cheese, shredded 

Assembly & bake:
1. Remove the pastry from the fridge and round out into two pan moulds.
2. Prick with a fork.
3. Divide the fillings into the two pastry pans.
4. Egg Mixture: In a separate bowl, whisk whipping cream, eggs and milk together.
5. Arrange the cheddar cheese onto the fillings.
6. Fill the pans with the eggs mixture. Make sure the vegetables are all covered.
View post on imgur.com
7. Bake at 200C for 40mins.
8. Remove from the oven, and let it rest before cutting.
View post on imgur.com

Three Ingredients Flourless Chocolate Cake

After my detox and wellness programme two years back, I have cut back on my baking, in particular, normal baking that requires flour and sugar. I searched for recipes that don't require sugar or can replace with low GI sugar, or use similar flours.

I decided to surprise my sister for her birthday by baking this flourless chocolate cake, which was rich but light. This recipe is a keeper, easy to make and satisfying to the palate.
View post on imgur.com

Recipe for Flourless Chocolate Cake, adapted from Gimme Some Oven.
(Makes a 8"round cake)

Ingredients:
8 Large eggs
450g Dark, semisweet or bittersweet chocolate, coarsely chopped
227g Unsalted butter
Zest of one orange (optional)

Method:
  1. Adjust an oven rack to the lower-middle position and heat the oven to 180°C. Line the bottom of an 8-inch pan with parchment paper. 
  2. Wrap the outside of the pan with 2 sheets of heavy-duty aluminum foil and set it in a large roasting pan. 
  3. In a stand mixer using the whisk attachment, beat the eggs at high speed until the volume doubles. This usually takes about 5 minutes.
  4. Meanwhile, melt the chocolate and butter together by placing the chocolate and butter in a large heatproof bowl, set over a pan of almost-simmering water, and stirring until melted and smooth. Add in orange zest if using.
  5. View post on imgur.com
  6. Then fold about a third of the beaten eggs into the chocolate mixture using a large rubber spatula until only a few streaks of egg are visible. Fold in half of the remaining egg foam, and then the last half of the foam, until the mixture is totally homogenous.
  7. View post on imgur.com
  8. Scrape the batter into the prepared pan and smooth the surface with a rubber spatula. Place the roasting pan on the oven rack and VERY carefully pour in enough boiling water to come about halfway up the sides of the pan. 
  9. View post on imgur.com
  10. Bake until the cake has risen slightly, the edges are just beginning to set, a thin-glazed crust (like a brownie) has formed on the surface, about 30-35mins. 
  11. Remove the cake pan from the water bath and set on a wire rack; cool to room temperature. Cover and refrigerate until cool. (The cake can be refrigerated for up to 4 days.)
  12. About 30 minutes prior to serving, carefully remove the sides of the pan, invert the cake onto a sheet of waxed paper, peel off the parchment paper, and reinvert the cake onto a serving platter. If desired, lightly dust the cake with powdered sugar and top with berries. 
  13. To slice, use a sharp, thin-bladed knife, dipping the knife into a pitcher of hot water and wiping the blade before each cut.
View post on imgur.com

Chashu

I am a big fan of ramen and their chashu, especially those braised with soy sauce. I have always wondered how they rolled the chashu to round shape. A search on google brought me to try Just One Cookbook's Chashu. I started exploring her recipe and it was so good, I made it multiple times already. However, I didn't roll it round, I used the pork belly as it is. Everyone who tried the chashu I made said it was very nice. Even though there were multiple steps and patience needed, the efforts were really worth it. Below is the recipe I made on my third attempt.

View post on imgur.com

Recipe for (Block) Chashu, adapted from Just One Cookbook
(Makes for 8-10 servings)

Ingredients:
1.2 kg Whole block pork belly, cut into 2 equal portion
1 Negi (long green onion), or leeks 
1 knob ginger
1 tbsp Cooking oil
1 cup Sake (240 ml)
1 cup Soy sauce (240 ml)
2 cups Water (480 ml)
100g Sugar

Method:
1. Heat the oil in a cast iron skillet (or regular frying pan) over high heat. Sear the fat side down first, then flip over to sear all sides until brown.
View post on imgur.com

View post on imgur.com

View post on imgur.com
2. While searing, put all the ingredients for seasonings in a heavy-bottom pot (or cast iron) that fits the Chashu. 
3. Add the Chashu and bring it to a boil, skimming the scum and foam. Then turn the heat to low/simmer.
View post on imgur.com
4. Put an Otoshibuta (drop lid) on top to press the ingredient down and limit the evaporation. (I used baking paper to cut to the shape of the pot)
View post on imgur.com
5. Simmer on low heat for next one hour, rotating Chashu every 20 minutes (keep Otoshibuta on all times!)
6. After one hour plus, the liquid will be reduced in the pot. I didn't cook further to reduce the sauce though. 
7. Turn off the heat and let the Chashu rest in the pot.
View post on imgur.com
8. To serve, slice the Chashu into ¼ inch pieces. 
View post on imgur.com
9. Use a blow torch to sear the Chashu slices to enhance the flavor. 
View post on imgur.com
10. Strain the leftover cooking sauce and refrigerate, or pour slightly to the Chashu for more taste.
11. Serve as sides, or in a ramen.
View post on imgur.com

View post on imgur.com

Braised Honey Pork Ribs

My family likes juicy tear apart pork ribs. However, I know to achieve such texture, long baking or stewing is required. With time on hand during one of the public holidays, I decided to do a braised honey pork ribs. 

I modified the recipe a bit. The result was well received. The first time I made, the taste was less intense. However, the second time was even better. The taste was more flavourful and the flesh came out easily from the bones. That was exactly what I had wanted to achieve. The recipe is easy to make and the dish was really tasty. My son requested for it often thereafter.
View post on imgur.com

Recipe for Braised Honey Pork Ribs, adapted from Christine.

Ingredients:
1 kg Pork ribs
salt, to taste
pepper, to taste
4 tsp grated Ginger root
4 cloves minced Garlic

Sauce:
3 tbsp Light soy sauce
2 tbsp Maggi sauce
3 tbsp Mirin
2 tbsp Kacap Manis
1 tbsp Fish sauce
2 Orange zest
2 tbsp Honey
2 tbsp Sesame oil
2 cups Water
View post on imgur.com

Method:

1. Cut the pork ribs into pieces. Blanch in boiling water to remove blood and any impurities, for about 3 minutes. Drain well. Wipe dry with kitchen papers. Season with salt and pepper. Set aside.
2. Heat oil in a frying pan. Cook the ribs over high-medium heat until lightly brown. Push ribs to the sides of the pan. 
View post on imgur.com
3. Add some oil. Saute the ginger and garlic until aromatic. Stir to combine with the ribs well. Transfer into a cast iron (Le Creuset) pot.
4. Pour sauce over the ribs. Place a piece of baking paper on top and cover with a pot lib. Bring it to a boil. 
View post on imgur.com
5. Reduce heat to low, and simmer for about 1.5 hours, or until the ribs are softened, sauce reduced to 1/5 and thickened. Along the way of cooking, occasionally stir the ribs to get them heated evenly. 
View post on imgur.com
6. Serve hot with sauce.