Rainbow Cake

This post is sponsored by Liv butter. Try Liv today!
Liv Butter - Salted & Unsalted-001

Times just flies by in a flash! It is already coming to end June. This year, I decided to bake a birthday cake for myself. It's a cake I've always wanted to bake - Rainbow Cake. I have put this in my list of to bake and finally, I got to bake it!
cake_rainbow06
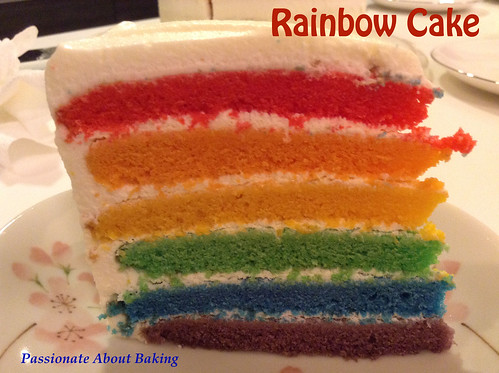
This cake recipe was adapted from Dreamersloft. Actually, it wasn't difficult to make, except having to mix the colours. I actually baked it in two batches of 3. I think I might have slightly overbaked it. I also didn't mix the egg whites well. But the rainbow colour made up for it!
cake_rainbow08
Recipe for Rainbow Cake, adapted from Dreamersloft.
(Makes a 7", 6 layers, recipe from Whisk Kid)

Ingredients:
320g plain flour
3 tsp baking powder
3/8 tsp salt
170g Liv unsalted butter, slightly softened
320g caster sugar
4.5 egg whites, room temperature
1.5 tsp vanilla extract
270g fresh milk, room temperature
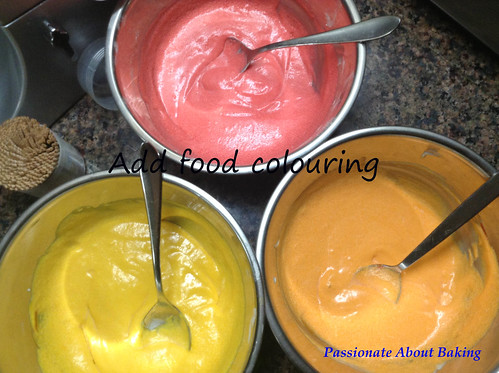
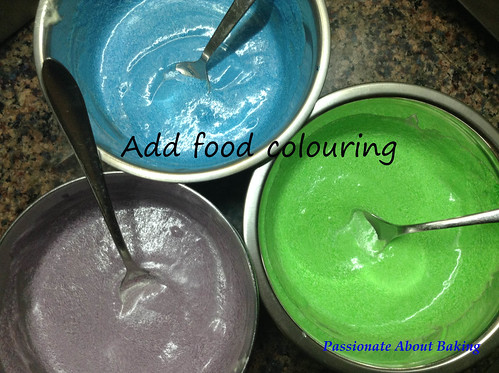
Red, green, yellow, blue gel colouring (Red, orange, yellow, green, blue, violet)

Method:

1. Preheat the oven to 180C. Grease 3 x 7" cake pans and line with parchment paper. (Alternatively, grease the cake pans and dust generously with flour, then tap away excess flour). Set aside.
2. Sift the flour, baking powder and salt into a large mixing bowl. Mix well and set aside.
3. Cream the butter and sugar until light and fluffy.
4. Add the egg whites gradually, then add the vanilla extract and mix until incorporated.
5. Add the flour mixture in 3 additions, alternating with milk, until just blended. Stop to scrap down sides of the bowl with spatula as necessary.
6. Divide into 6 portions (each about 180g).
7. Add food colouring to each portion using toothpick, bit by bit to desired colour tone. Mix thoroughly to ensure all the colouring is well blended with the batter.
cake_rainbow01 cake_rainbow02
8. Pour batter into cake pans and smooth the surface. Bake for about 13 mins. Remove from the oven and let it cool for a couple of minutes. Remove the cake from the pan and let it cool completely. Bake the other three batters.
9. Place the cake pans on a wire rack to cool for 15 mins. Invert the cakes onto rack and let cool completely. If not frosting immediately, wrap each layer individually with clingwrap.
cake_rainbow03
Frosting
500g Whipping Cream
50g Sugar

1. Put all ingredients in a mixing bowl and beat until stiff peak.
2. To assemble the cake, place one cake layer on a serving plate/tray and spread some whipping cream evenly. Repeat this process until all cake layers are stacked.
cake_rainbow04
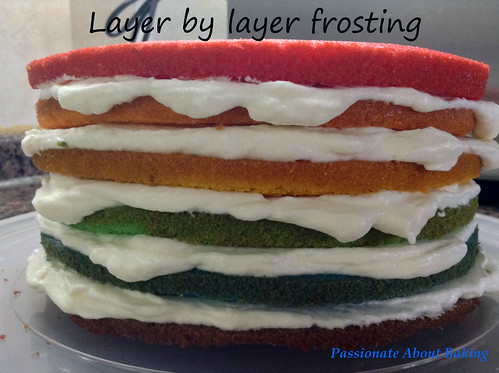
3. Crumb-coat the top and sides of the cake, and place the cake into the fridge to chill for 30 mins.
cake_rainbow05
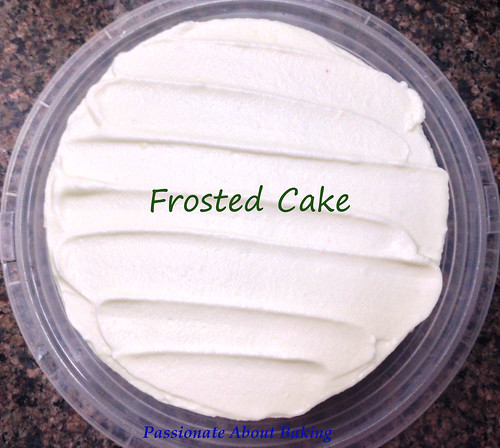
4. Frost the cake and garnish as desired.
5. Chill the cake to set the frosting. Leave in room temperature for at least 1 hour before serving.
cake_rainbow07


No Churn Vanilla Ice Cream

Don't we all get attracted by easy and good recipes? At least I do. No churn ice cream sounds good to me as my family loves ice cream - stick, cone or tub. We usually have some form of ice creams in our freezer to satisfy our cravings.

As my fridge ran out of ice cream recently, I decided to make some ice cream. This recipe - No Churn Vanilla Ice Cream, is really easy to prepare. However, it is very sweet even after I reduced the condensed milk. The taste, smoothness was pretty much like a real ice-cream, except it lacks some body. Such ice cream cannot crystalised like the real thing. Nothing can compared to those ice-cream made with custard, this is just a quick fix on ice cream cravings.
icecream_vanilla05
Recipe for No Churn Vanilla Ice Cream, adapted from Baking Bites.
(Makes a 1 litre tub)

Ingredients:
300g  Sweetened condensed milk (Milkmaid)
2 tsp Vanilla beans paste
500g Whipping cream
icecream_vanilla01
Method:

1. Whisk together sweetened condensed milk and vanilla in a large bowl until well-combined.
icecream_vanilla02
2. Whip cream to stiff peaks in a large bowl. Stir 1/3 of the mixture into the sweetened condensed milk to lighten it, then fold in remaining whipped cream.
icecream_vanilla03
3. Transfer to a freezer-safe container and freeze until firm, at least 3 to 4 hours, or overnight.
icecream_vanilla04

Cheese & Herbs Buns

I'm hooked on the pre-fermentation method for breads. They are just so easy. Here is another easy Cheese & Herbs Buns to share.
bread_cheeseherbs09
Recipe for Cheese and Herbs Buns, modified from天然麵包香Natural Breads Made Easy.

(Makes 12 Buns)

Ingredients:
Pre-ferment dough
245g Bread flour
140g Water
3g Instant Yeast
3g Fine salt

1) Prepare pre-ferment dough: Mix yeast with water, then combine with bread flour and salt.  Knead till smooth dough. Cover and keep in fridge for at least 17 hours before use. (I kept this for about 48 hours because I had no time to bake.)

Main dough
105g Bread flour
4g Fine salt
2g Instant yeast
28g Fine sugar
70g Water
28g Olive Oil
2 tbsp Dried Basil leaves (or any herbs)

Fillings
Some Prego Herb & Cheese Pasta Sauce (can replace with tomato sauce to make it a pizza bun)
100g Mixed red and white shredded Cheddar Cheese
100g Shredded Mozzarella Cheese
A dash of grind black pepper

Method:
2) Mix all ingredients for main dough till combined. Gradually add in the pre-fermented dough, piece by piece and knead to get a smooth dough. 

3) Cover and proof the dough for 30 minutes.

4) Shape the dough and place aside and let it rest for 15mins.

5) Roll the dough out flat and squarish. Spread the Prego sauce evenly on the dough. Followed by sprinkle with cheddar cheese and black pepper.
bread_cheeseherbs01 bread_cheeseherbs02 bread_cheeseherbs03
6) Roll it out like swiss roll and seal it tightly. Cut out 12 pieces equally.
bread_cheeseherbs04
7) Place it in a paper cup on a baking tray, and let it proof for 45mins.
bread_cheeseherbs05
8) Sprinkle with Mozzarella Cheese, and bake in preheated oven of 180C for 15 minutes till golden brown. 
bread_cheeseherbs06
9) Remove from the baking tray immediately after baking. Let it cool completely before consuming.
bread_cheeseherbs07 bread_cheeseherbs08